- Use your web browser to download a copy of the LC-2 software from http://www.eecs.umich.edu/courses/eecs284/lc2.exe. Save the file in a convenient location (for example, on the desktop or at the top level of the C drive).
- Open the file by double-clicking on it (unless your browser has already opened it for you). It will extract several files, including LC2Edit.exe and simulate.exe. You may be asked whether you want to retain the directory structure; answer yes. When the files have been extracted, you have finished installing the LC-2 software.
Use the LC-2 editor to create a machine-language program.
The first step in any programming project takes place away from the computer keyboard. That is planning what we want the program to do. Let's make it simple. Let's multiply some number by 5 and then negate it. This will require us to use several arithmetic and logical operations. Here is a pseudo-code description of the program:
- Load the number in a general purpose register
- Multiply the number by 5
- Negate the number (perform the 2C operation)
- Stop processing
- Load the number in a general purpose register
- Clear a register
- Add the number to the register
- Multiply the number by 5
- Multiply the number by 2 and place result in another register
- Multiply that number by 2 again
- Add the original number to the result of the two multiplications
- Negate the number (perform the 2C operation)
- Flip all the bits
- Add one
- Stop
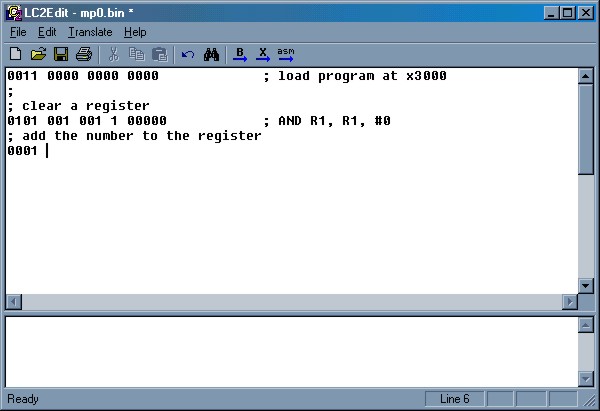
; clear a registerWe will then translate each assembly instruction into a machine language instruction and type it into our program. We will use the LC-2 editor for this. Find the icon for LC2Edit.exe and double-click on it to open the editor. You'll notice a control panel at top and two windows below. The middle window is where you will type your program. Later, when you convert your program to an object file, you will see messages in the lower window.
AND R1, R1, #0
; add the number to the register
ADD R1, R1, #6
; multiply by 2
ADD R2, R1, R1
; multiply result by 2 again
ADD R2, R2, R2
; add the original number
ADD R2, R2, R1
; flip all the bits
NOT R3, R2
; add 1
ADD R3, R3, #1
; stop
HALT
Your program must begin with a line that tells the simulator where to load the program in memory. For this course, that will always be at x3000. We will translate that into binary:
0011 0000 0000 0000 ; load program at x3000Notice that the spaces make it easier to read (and write) long strings of bits. They are ignored when we convert to an object file. Also notice that the comment will help us remember why we have placed this strange string of 1s and 0s at the beginning of our program.
We now begin translating our program's instructions and placing them in the file. Each instruction will have a four-bit opcode followed by some number of operands. In many cases, the machine language instruction has the same number of operands as the corresponding assembly language instruction, but some instructions have more than one version, and an additional operand tells which of the versions to use. For example, to translate the first instruction, we must specify which version of the AND instruction we want to use. On page 12 of the LC-2 manual, we find that there are two assembly formats for AND:
AND DR, SR1, SR2The first instruction of our program matches the second format, so we will follow the second encoding scheme shown on page 12. We must figure out the binary encoding for each of the placeholders (DR, SR1, and imm5) as well as the single bit that tells which instruction format we are using:
AND DR, SR1, imm5
- opcode for AND:
- 0101
- destination register (R1):
- 001
- source register (R1):
- 001
- code for immediate addressing:
- 1
- immediate value (0):
- 00000
; clear a registerAgain, the spaces make it easier for humans to read and interpret the meaning of the instruction, as do the comments. The spaces and comments are ignored when we convert and run the program.
0101 001 001 1 00000 ; AND R1, R1, #0
The HALT instruction is a special case, called a TRAP. Information about it can be found on pages 27 and 33 of the LC-2 manual. For now, all you need to know that it is encoded in binary as xF025.
After typing in your your complete program, save it as a file with a name ending in .bin (we'll assume it's called mp0.bin). You are then ready to convert your program to an object file.
Convert your program from ASCII characters to an "object" file.
The "binary" file you created in step 2 cannot be read by the simulator. It contains a lot of extra information that would get in the way of efficient execution of your program. First, we must convert it, which stips out extra spaces and comments and (most important) reduces each instruction to a 16-bit binary word. What you typed was actually a string of ASCII characters representing 0s and 1s. The conversion translates the ASCII characters into a "true" binary program, which can be loaded into the LC-2 simulator and executed. We will call this an "object" file.
To create the object file, click the button labeled with a "B" and an arrow in the editor's control panel. A message will appear in the lower window telling whether any errors occured in the conversion. (If you get no errors, you can go on to step 4, but you may want to try introducing a small error and converting again. For example, delete the final bit from the HALT instruction, convert again, and then restore the missing bit).
Compiling without errors creates an object file, and the message in the bottom window tells you the name of that file (if your binary file was named mp0.bin, the object file will be mp0.obj).
Run your program and check it for errors.
Now it's time to load your program in the simulator. Find the icon for simulate.exe and double-click on it to open the simulator. You'll see a control panel at top and one large window below. At the top of the window you'll see four lines containing labels for each of the LC-2's general purpose registers (R0 through R7) as well as the program counter (PC) and instruction register (IR). Each label is followed by a four-digit hex number (initally all zeros, in most cases) and a decimal number. These numbers show the contents of the registers that tell you the most about what's going on inside the LC-2 as a program executes. We will use these a lot as we run programs in the simulator. Below the register display is a series of lines that are probably mostly zeros initially. Each line is labeled at left with a line number. The first line is probably labeled "x3000". That's the place in memory where we want your program to be loaded.
To load your program, select "Load Program" from the "File" menu and find the object file you created in step 3. Then click the "Open" button. Your program should be loaded into the simulator, beginning at x3000 (if not, verify that you encoded x3000 correctly as the first line of your program in step 2). You will notice a binary representation of each instruction on the left side of the simulator's main window and an assembly language interpretation on the right. You can verify that the encoded program is what you intended by comparing the assembly language interpretation with the assembly language instructions shown in step 2 of this assignment.
There should be a blue arrow pointing to the line labeled x3000. That indicates the next instruction to be executed. It should correspond to the value in the program counter (PC). Before running the program, think about what you expect the program to do. What do you think will be in each of the general-purpose registers when the program halts? Write down your predictions.
To run your program, you can select "Run" from the "Simulate" menu (or you can click on the "Run" button in the toolbar). Did the program run all the way through and halt? What instruction is the blue arrow pointing at? Did you get the results you expected? (If not, why not?)
When you run the program, everything happens very quickly. If you've worked with a modern programming environment, you probably know the value of being able to "step" through a program one instruction at a time to see that it is acting as you wish it to step-by-step. You can reset the blue arrow to the beginning of your program by clicking once on the line labeled x3000 and then selecting "Set PC to Selected Location" from the "Simulate" menu. The blue arrow will return to x3000 and the PC will contain x3000. Now you can step through the program one line at a time, by selecting "Step" in the "Simulate" menu (or by clicking the "Step" button in the toolbar). Before stepping, write down your prediction about what will change when you execute the next instruction.
If you find errors in your program, go back to step 2. Correct the error and save your program again. Then convert it again as described in step 3. Then load the new object file and test it again as described in this step.
Learn to spot errors in programs.
In step 4, we described a process by which you can step through a program one instruction at a time to find errors or irregularities in the way a program executes. Even if you didn't need to use that process to check your own program, you should try it out. Download the file sample0.bin and save it in the directory containing your LC-2 files. Then open it with the LC-2 editor, convert it to an object file, and load the object file in the simulator. The program in this file is similar to the program you created earlier in this lab. It starts by initializing a register to 15. It negates that number and multiplies it by 5. But if you run it, you will find there is a mistake. Start over and step through the program one line at a time until you find the error. Correct the error and run the program again.