
EECS 311 | Electronic Circuits
Home | Schedule | Problem Sets | Labs | Tutorials
HP4155 Semiconductor Parameter Analyzer Tutorial
Table of Contents
- Inserting a BJT into the Instrument
- Loading a Measurement Program
- Measuring IC vs VCE
- Using the Marker/Line to Measure Beta and VA
- Modifying a Measurement Program
- Saving Sweep Data to a PC
The HP4155 Semiconductor Parameter Analyzer is used to measure transistor characteristics such as Beta, Early voltage, and threshold voltage. The HP4155 has two types of keys: "hard" keys, which are dedicated buttons on the front panel, and a column of "soft" keys, located to the right of the screen. In the tutorials below, a KEY will represent a hard key and a KEY will represent a soft key.
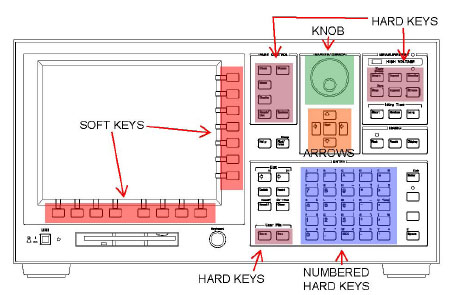
HP4155 front panel.
Inserting a BJT into the Instrument
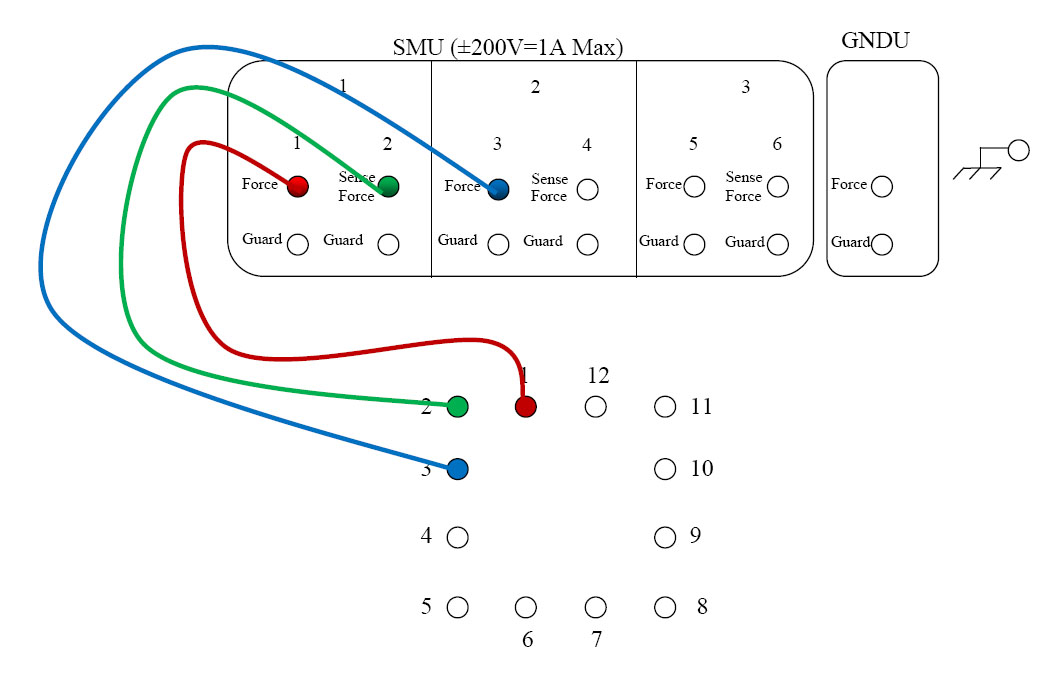
- Connect jumper wires as shown below to connect the SMU pins to the
circular connector. SMU1 to pin 1, SMU2 to pin 2, and SMU3 to pin 3.
Jumper connections in HP 16442A test fixture. - Insert a BJT into the HP 16442A test fixture as shown below with the
emitter in pin 1 (SMU1), base in pin 2 (SMU2), and collector in pin 3
(SMU3).
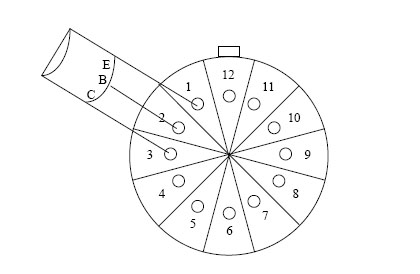
BJT inserted into the HP 16442A test fixture.
Loading a Measurement Program
- Press GET; FILE
CATALOG. Using the
Arrows, scroll to the desired program (i.e.
select program PPNP1 for a PNP transistor).
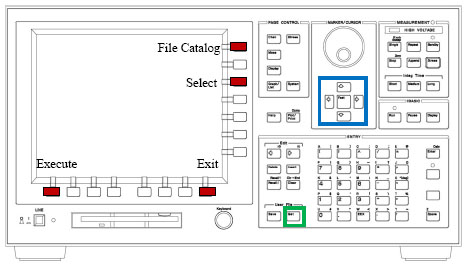
Buttons to load the file catalog and navigate to desired program. - Press SELECT;
EXECUTE;
EXIT to load the program.
Buttons to execute the desired program.
Measuring IC vs VCE
- Load the appropriate program from the table below using
GET; FILE CATALOG.
Then press SELECT;
EXECUTE;
EXIT to load the program.
Measurement program file names for BJTs.Device Measurement Program NPN PNPN1 PNP PPNP1 - Press SINGLE to measure IC vs. VCE.
Each curve represents a different value of IB starting at 0µA and
increasing in 5µA intervals.
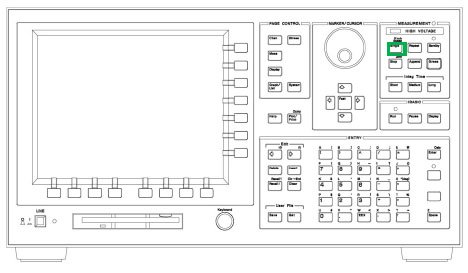
Press single to start the measurement. - Press SCALING;
AUTOSCALING to scale the curves so they all fit on the plot.
Autoscale the plot to fit all traces.
Using the Marker/Line to Measure Beta and VA
- Load the program to measure IC vs VCE, then run the measurement and autoscale the results.
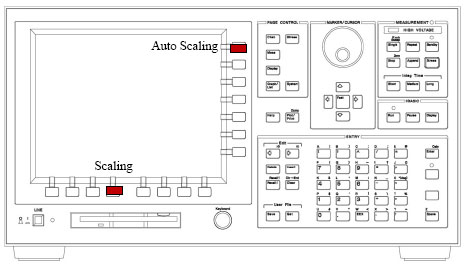
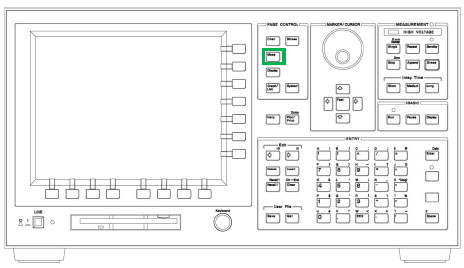
- Press MARKER/CURSOR;
MARKER OFF/ON to turn the marker on. The
soft key should now be purple and read MARKER ON.
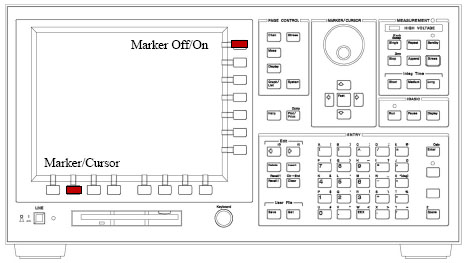
Turn the marker on. - Using the Knob, move the marker to your
desired VCE. Use MARKER SKIP to move the
marker to different IB curves until you find the desired IC and VCE bias
point.
Use the knob and Marker Skip to place the marker at the desired bias point. - Read off the values of IC and IB and calculate Beta.
- To measure Early voltage, with the marker still placed on the
desired bias point, Press LINE;
CURSOR TO MARKER;
LINE SELECT. The LINE SELECT soft
key should turn purple and say LINE SELECT 1.
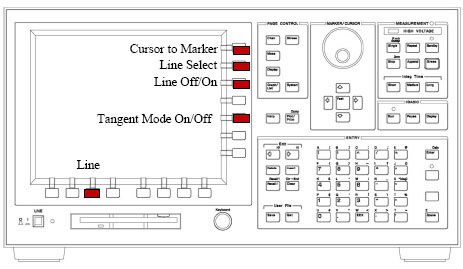
Select the line and bias point to measure VA. - Press LINE OFF/ON. The soft key should
turn purple and now read LINE ON. Press
TANGENT MODE ON/OFF. The soft key should turn purple and read
TANGENT MODE ON.
Select the line and bias point to measure VA. - The Early voltage is the point where the tangent line intersects the VCE-axis, which is displayed on the bottom of the graph.
Modifying a Measurement Program
The default measurement programs have coarse steps in IB and VCE for fast measurements. However, it is likely that these ranges and step sizes are insufficient to capture your bias point. In this case use the following steps to modify the sweep range and number of points.
- Load one of the default measurement programs by using GET; FILE CATALOG, highlighting the desired program, and pressing SELECT; EXECUTE; EXIT.
- Pres MEAS to bring up the measurement
parameters. The default variables and sweep ranges will be displayed.
Bring up the measurement parameters. - Use the Arrows to navigate to the
desired variable and highlight either the starting value, step size, or
number of steps. (Note: the stop value will automatically update based
on these other parameters and you cannot edit it directly).
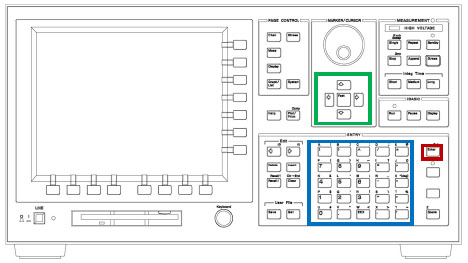
Navigate to the desired variable and parameter to change. - With a parameter highlighted, use the numeric keypad to key in a new
value. For example to enter a step size of 200nA, highlight the step
size field and type
2 0
0 n
ENTER.
Navigate to the desired variable and parameter to change. - Once all parameters have been updated, press SINGLE to start the measurement.
Saving Sweep Data to a PC
- Download the HP4155 Read Data virtual instrument for LabVIEW. Save it on the PC.
- Follow the instructions above to Load a Measurement Program and perform a measurement using the HP4155.
- Double-click the HP4155
Read Data.vi file to run open it in LabVIEW. Follow the
instructions in the VI to read the data to a file. The VI records only
one variable at a time to a file. To read multiple variables, run the
VI once for each variable, assigning unique file names for each
variable.
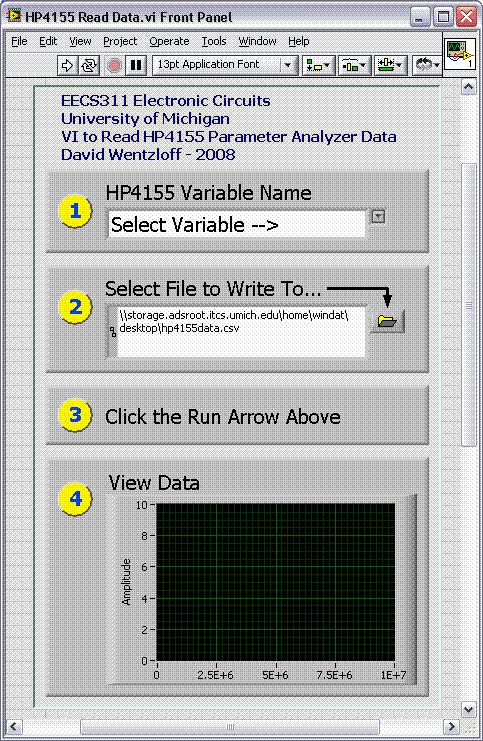
HP4155 Read Data virtual instrument.