Guitar Hero Robot
EECS373 – Fall 2008 – Final Project
Andrew Balash, Paul Shi, Daniel Park
Introduction
The goal of this project is
building a robot which plays the Guitar Hero video game. A lot of people enjoy
the guitar hero game nowadays, and we thought it would be great to build a
robot which can be a “guitar hero”. We use actuators to press and strum the buttons
on the guitar hero controller to play the game. We used light sensors to read the
game screen on an LCD monitor. Our ultimate goal is a robot that plays high
percentage hit rate on guitar hero game regardless of difficulties of song.
High Level Design
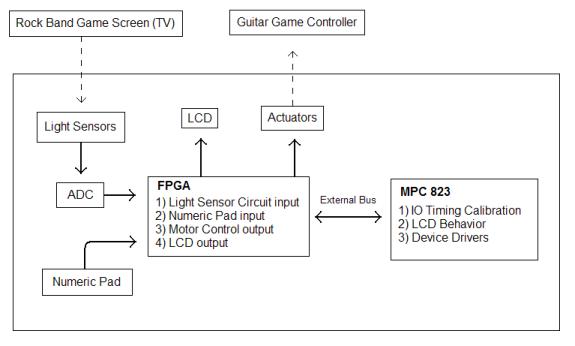
The robot detects the note from the screen using a light sensor of a photo resistor circuit connected to the ADC. Using the data from light sensor, the software checks it against a calibration value and decides if a note was present. It continues polling the display and strums the guitar controller at the right time to play the game well. Additionally, there is a dip switch to pause the software to stop detecting. Whenever buttons are pushed, the LCD character display shows which notes are currently pressed. We poll the sensors every one millisecond.
High-level functional
diagram
Member Task Distribution
Andrew Balash: Main function, light sensor
Paul Shi: Servo motors, LCD Display
Daniel Park: Keypad
Hardware Design
The main function of the “Guitar Hero” robot is to watch the screen and play guitar according to notes passing through. We have two hardware components to accomplish these two tasks, and two auxiliary components for calibration and additional output.
- Light Sensors
Light sensors are like human eyes to watch screen and detect which notes should be pressed on the guitar controller. They will detect the change in luminance from the screen as notes passing and resulting in luminance difference with background. Light sensors were implemented using a photoresistor circuits, which is functional variable resistor. Its resistance will decrease when a note passed in front of it, and ADC converts the voltage drop on the resistance to digital signal, which is fed to processor.
- Actuators
Six linear actuators are used to act like human fingers in order to play guitar controller. Five are used to press buttons on different frets. Another one is used to strum. Push type actuator is chosen. In order to push button and strum, write the desired patterns of 1s to mapped I/O address to activate corresponding actuators. Strum is associated with actuators and will be activated if any button is pushed. To accommodate power requirement of actuators, which will consume up to 6 watts each, power FET is used instead of BJT as switch to turn actuator on and off. Since the lab kit cannot provide enough power, a 102 watts computer power supply is used.
- LCD Character Display
LCD has two functions. First is to display which fret(s) needs to be pressed according to notes detected by light sensors. Second function is to display information for calibration purpose. There are two critical calibrations are needed. In order to detect multiple notes, accumulation of result from light sensor is necessary. The time interval of accumulation varies based on game difficulty and is displayed. Second calibration is delay between detecting a note and playing guitar. This time delay is also different based on game difficulty. Strum delay is on the left side of bottom line. Accumulation is on the bottom-right side.
- Numeric Keypad
Numeric keypad is used as input for changing calibration values. Pressing “A” first will start inputting accumulation time variable. Pressing “D” will start inputting strum delay time. For both variables, the unit is milliseconds in hex. The series of key presses is collected by a software driver and then returned to the main software. The main software then parses out the calibration type and value.
Result of the Design
As a whole, our project worked better than we expected. It hits the corresponding buttons at corresponding time, and scores very well on songs even at expert difficulty. Timing issue is the key factor of this game, so hitting the right buttons at right time is implying that the robot has become a true guitar HERO. Even superman had a weakness to kryptonite, though, and our robot has a kryptonite too. This is explained next.
Our project had two major glitches, which greatly reduced its functionality. The first is that if notes of a single color were too close to each other (on single line), the photo resistor reads those notes as one big note. This means that we only detect and strum one note, and miss the others. The second is that when notes change in extremely rapid succession, the software fails to detect the subsequent notes. This is caused by a second note being under its photo resistor while the first is not out from under its own yet. This is a software issue which was unable to be resolved in time. This second glitch has a major impact on our projects performance, in that most songs in Guitar Hero include a “guitar solo” section which includes rapid note changes.
Conclusions
We were able to implement our design with our components as we planned at the beginning of the project. On some songs, our guitar hero robot is playing the guitar hero game perfect on easy mode and about 90% hit rate on expert mode. However, due to the glitches listed above, many songs cannot be played.
Now that we have completed the project, we can look back on how well things worked, and what we could have done things differently. Processing power was not an issue on our project given that most of the actions are very simple and there are no intensive computations. We also had adequate ADC channels, and believe that the actuator response time was just adequate enough for our project. The main difference we could have made would have been to use more C instead of so much assembly. This would have made coding somewhat easier.
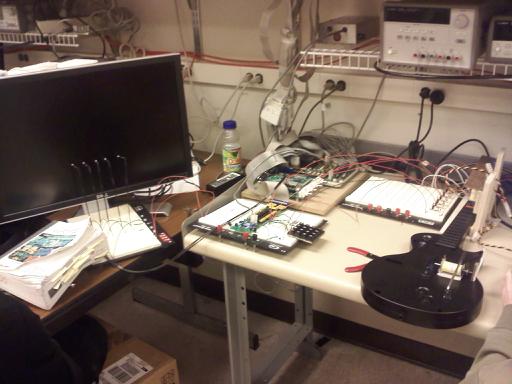
Media
Guitar Hero Robot overview:
Video of robot in action. 90% notes hit on Expert for Miss. Murder:
http://www.youtube.com/watch?v=qCti-DVkwOU
References
Standard components can be found on:
http://www.eecs.umich.edu/courses/eecs373/Labs/devices/devices.html
Actuator:
http://www.electromechanicsonline.com/product.asp?pid=25
Light Sensor:
http://www.eecs.umich.edu/courses/eecs373/Labs/device_slides.pdf