EECS 373 SoftConsole Assembly Readme
Create and setup a new assembly project
- File > New > C Project
- Type project name
- Select the location that will be the project folder. If
default workspace is selected, then a project folder with the given
project name is automatically created in the workspace.
- Under Project type: select Empty Project
under Executable (Managed Make)
- Under Toolchains: select Actel Cortex-M3 Tools
- Click Finish
- Right click on the project folder in the Project
Explorer (left window pane) and select Properties. Then go
to C/C++ Build and expand it. Select Settings
and look at the Tool Settings tab.
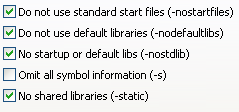
- GNU Linker > General - Check everything BUT Omit
all symbol information (-s)
- GNU Linker > Miscellaneous - In Linker flags add -T../link.ld
(actual linker script will be added to project later)

- GNU Assembler > General - In Assembler flags add -g3
(for debugging assembly code)

- Click Apply and then OK
Create minimum running assembly code
Use Right click > Save Link as...(Firefox) or Save
Target as...(IE) to get the files.
- Add startup.s
and link.ld
to the project by dragging (or cut and pasting) the files from
Window’s Explorer to the project folder in SoftConsole Project
Explorer.
- Create a function main in a user created assembly file
(File > New > Source File) with a .s extention
Create fully capable assembly code (Interrupts and printf373)
Use Right click > Save Link as...(Firefox) or Save
Target as...(IE) to get the files.
- Add startupWithInt.s
(instead of startup.s from above), printf373.c,
printf373.h,
and link.ld
(same as above) to the project by dragging (or cut and pasting) the
files from Window’s Explorer to the project folder in SoftConsole
Project Explorer.
- Add this CMSIS
folder to the project folder (you can use Import or cut and paste the
whole upzipped folder into Project Explorer).
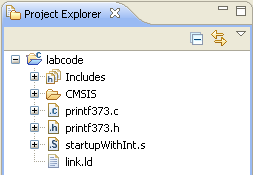
- Import only the mss_uart folder (generated by Libero IDE)
from the concurrent FPGA project. They contain the UART drivers
required to print strings to terminal.
You can accomplish this by right clicking your project, then
select Import. On the next window select File System
under General and click Next. Browse to your Libero FPGA
Project folder and select the firmware subfolder. Then click OK.
Expand the firmware folder, and then expand the drivers folder. Add a
check mark to the mss_uart folder. Then click Finish.
You can safely overwrite already existing files.
- Create a function main in a user created assembly file
(File > New > Source File) with a .s extention
How to build (compile) projects
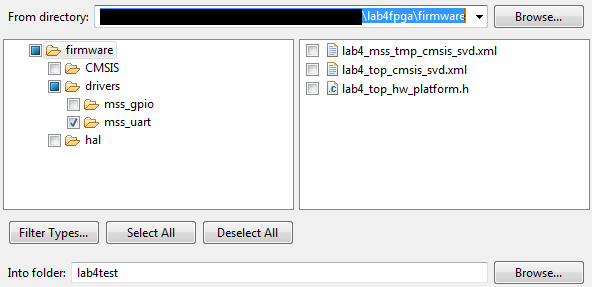
Under Project > Clean:
- Check Clean projects selected below
- Check the project (only one) you want
- Check Start a build immediately and Build only
selected projects
- Click OK.
Clean build is prefered but Hammer icon  works in
most cases. It is faster because it doesn't clean before compiling.
works in
most cases. It is faster because it doesn't clean before compiling.
Final assembled code location
After the code is built, check the project_name.lst
file under Debug folder in the Project Explorer
Debugging session
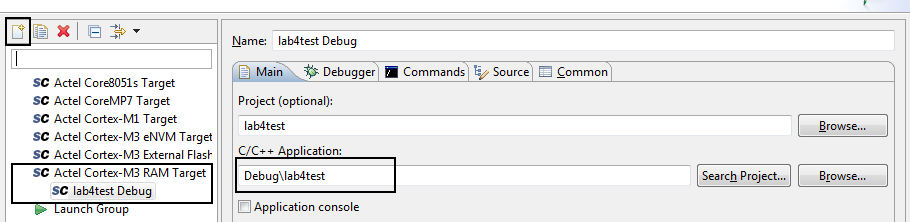
Creating NEW Debug configuration (only done once)
- Make certain the code has compiled successfully.
- Go to Project Explorer > project_folder > Right-Click
> Debug As > Debug Configurations...
- In the left pane, under Actel Cortex-M3 RAM Target,
delete any New Configuration entries using

- Create a new Debug configuration by selecting Actel Cortex-M3
RAM Target and clicking

- Make sure Project (Optional): and C/C++ Appliation:
are filled as shown below. If not, then you did NOT build/compile
your project.
- Finally, click Debug.
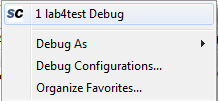
Running Debug once configuration exits
- If the configuration exits, jump to Eclipse's debug window by
clicking on the Debug button
 at the
top right.
at the
top right.
- Now choose this project's debug configuration by selecting it
from the drop down list of (De)bug button

How to use printf373() with assembly
Copy paste the following UART_0 initialization code at the begining of
the main function. Make sure that you are not overwriting
registers when you copy/paste this inside your code.
@ Initalize MSS UART 0
movw	r0,	#:lower16:g_mss_uart0
movt	r0,	#:upper16:g_mss_uart0
movw	r1,	#:lower16:57600			@ UART Baudrate
movt	r1,	#:upper16:57600
mov	r2,	#3
bl		MSS_UART_init
Create strings as shown below. Place any string after .text
symbol but before the first function name .global fun_name in
an assembly file.
strName: 	.asciz "print the number: %d\n\r"
strName2:	.asciz "xyz\n\r"
strName3:	.asciz "so on...\n\r"
	.align 2
strNameX: is the address of the string. .asciz
tells the assembler to create a null terminate version of the given
string. .align 2 tells the assembler to pad odd length
strings to make them a multiple of 2. This is required for assembly
debugging.
Finally, call printf373 like any other function. The first parameter is
the string address. The rest of the parameters are all the variables to
be printed. The variable value is passed in r1, not the pointer to the
variable. For example, if you are to use strName from above, pass the pointer
to the string strName in r0 and the value that you want to print
in r1.
movw	r0,	#:lower16:strName
movt	r0,	#:upper16:strName
movw	r1, 1	@in this case we are printing the value 1 in decimal. The output will appear "print the number: 1"
bl	printf373
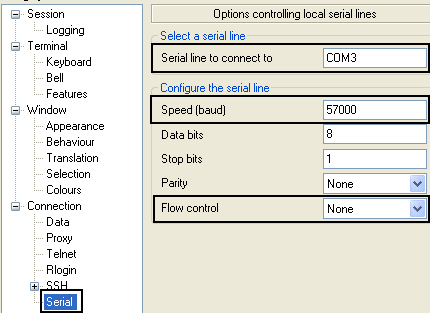
Putty Setup
SmartFusion Serial Port
Two USB cables are used with the SmartFusion kits. One is for the
Debug port for SoftConsole and programming the FGPA. The other is for
supply power and acts as a standard serial port (UART). A special
driver is installed in the 373 load to "convert" the USB port to a UART
on COM3. You can see this via the device manager (My Computer
-> Properties -> Hardware tab -> Device
Manager). Note since this is a USB device the USB
cable has to be plugged and attached to the SmartFusion board.

Putty is a common , free terminal and should be installed on
the current 373 load. Go to the program menu or find it in the
start menu. If it is not available you can download it here
- Under Session, check Serial
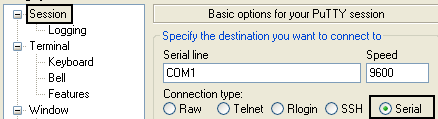
- Under Connection > Serial: Use the following
settings: Baud - 57600, Data bits - 8, Parity - None, Stop bits - 1,
Flow control - none.
Hints/Notes
- Be extremely cautious when copy/pasting assembly code.
Over writing critical register values is incredibly easy.
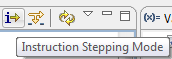
- Use Instruction Stepping Mode to force the debugger to
only step one instruction at a time, even in assembly. Sometimes the
debugger seems to mistake branches for functions and skips entire code
segments.
- Debugger troubleshooting tips:
- Hardfault Handler when paused - asserts and segfaults causes
the processors get stuck here
- 0x6000XXXX address when paused - MSS Configurator Bootcode
issue if not using eNVM. Restart Flashpro and reflash the board.
- .data section should be utilized for global variables if
the .text section moves to Flash. However, the .data
section is not initialized for now.
- Other than branch to main in the Reset Handler and the
actual vector table itself, no other start code should be required. The
debug session sets everything up for us.