EECS 487, Winter 2007
Project 2: Shading
Overview
In this project you will implement several shading algorithms. First, you will compute the OpenGL lighting model in software and pass the results to OpenGL in the form of colors assigned to vertices. Second, you will use the OpenGL Shading Language (GLSL) to implement a modified version of the standard OpenGL lighting calculations. You will finish up by writing a simple shader that uses an environment map to simulate reflective surfaces, and perturbs normals using a bump map.
You are given support code for this project and will need to
- link to the jot library (the same as for project 1),
- copy the project support code, follow the instructions in the README file to compile, and
- implement the missing functionality.
Support Code
Copy the project support code to your local machine. (On windows, you can execute the following commands using cygwin, which we recommend):
% scp -r red.engin.umich.edu:/afs/engin.umich.edu/class/perm/eecs487/proj2 .(Note the 'dot' at the end of line.) The above command overwrites all proj2 files, including any files that you may have made changes to. To copy 'old' versions of files while leaving the new untouched (sync-ing operation):
% rsync -avz red.engin.umich.edu:/afs/engin.umich.edu/class/perm/eecs487/proj2 .(Do this from the parent directory containing the proj2 subdirectory.)
Windows users can use set up an sftp session to red.engin.umich.edu and grab the files from the above path or, on (CAEN) machines with AFS mount, copy the files from:
K:\perm\eecs487\proj2
Note: the above path depends on how CAEN space is mounted on your PC. See the project 2 README file if you need help mapping a network drive to connect to the course directory.
Tasks
Read through the source files to get familiar with them, then implement the following missing functionality:
1. Software lighting (25 points)
Implement the OpenGL lighting model in software by completing the definition of the SWShader class. Compute the color of each vertex by taking into account the material properties of the Patch containing the vertex, as well as the global ambient light and the ambient, diffuse, and specular contributions of each of the active lights. (Throughout this project you can ignore light emitted from the surface.)
Handle directional lights, point lights and spot lights. Follow the equations given in the red book (our text: The OpenGL Programming Guide), on page 224, in the section called "the mathematics of lighting." Use the equation that appears under the heading "putting it all together." Ignore the statement above that which reads: "if L*n = 0, the specular term is 0" -- the equation ignores it too :)
You software shader should produce identical results to the "Smooth Shading" rendering style in jot (only slower).
Note: you can assume LIGHT_MODEL_LOCAL_VIEWER is true, which means the view vector v is not constant over the mesh, but is instead computed by subtracting the vertex location from the camera position. (In eye space, the camera location is the origin).
There are comments in the file shaders.C that tell where to put your code that implements the lighting calculations, and gives more information about accessing the needed data in jot. Specifically, almost all of your code can go in: SWShaderStripCB::light_contribution().
Important Note: for this part you need OpenGL 2.0. OpenGL 1.5 may work, but is not recommended. When you run p2, it prints information about the version of OpenGL supported on your system. Unfortunately, while the newer CAEN labs support OpenGL 2.0, the graphics cards in most machines are not capable of running more than the simplest GLSL programs. The following labs have good support for GLSL, so we recommend you use them:
Implement a modified version of the OpenGL lighting calculations in GLSL shading language. You can start with the provided vertex and fragment shaders lighting.vp and lighting.fp (which implement the standard OpenGL lighting calculations) then change them as follows.
Diffuse component: The standard diffuse lighting calculation uses the value of surface normal dotted with light direction (n * l). In your shader, replace n * l with a modified value: smoothstep(e0, e1, n*l), where e0 and e1 are constants, with 0 < e0 < e1 < 1. (smoothstep is a built-in function available in GLSL.) We suggest you use e0 = 0.25 and e1 = 0.9. (In your write-up explain what values you used.) This results in more extreme lights and darks. A more cartoonish effect can be achieved by using values of e0 and e1 that are closer together (e.g. 0.4 and 0.5).
Specular component: The standard specular lighting calculation uses h*n, the "halfway vector" dotted with the normal vector. (The OpenGL "red book" uses the symbol s for the halfway vector; Shirley's book describes the same thing and names it h on page 196.) An alternate formulation uses r*v, where r is the reflection vector, and v is the view vector pointing from the surface to the camera. (All vectors are unit length and '*' denotes the dot product.)
In your shader use r*v in place of h*n. The standard specular computation controls the size of the specular highlight by raising this value to a power k (the specular exponent). In your shader, instead of (r * v)k, use smoothstep(s0, s1, r * v), where 0 < s0 < s1 < 1. We suggest you use s0 = 0.75, s1 = 0.95. Larger values result in a more focused highlight. (Again, explain what value you used in your write-up).
To find the reflection vector r, you can use: r = l - 2(l*n)n; or better yet, use the built-in reflect function: r = reflect(l,n). Both are equivalent, and both assume that l is the vector pointing from the light to the surface. (Page 196 in Shirley's book gives an equivalent expression based on l pointing the opposite direction.)
Ambient component: Handle ambient light in the same way as in the standard lighting calculations.
Abstracted normals: Add functionality to modify the "level of abstraction" in the shading, by manipulating the surface normal used in the diffuse and specular lighting calculations. In brief, use the original normals when viewing the surface up close, and "abstracted" normals when viewing the surface from far away. Do this as follows.
Compute the vertex position and normal (in eye space) in your vertex program, and pass these to the fragment shader as varying variables (so the values are interpolated across the triangle). The support code already passes the center of the model's bounding box c (in eye coordinates) and its diameter R to the shader. If p is a point on the surface, then the abstracted normal is just: a = normalize(p - c).
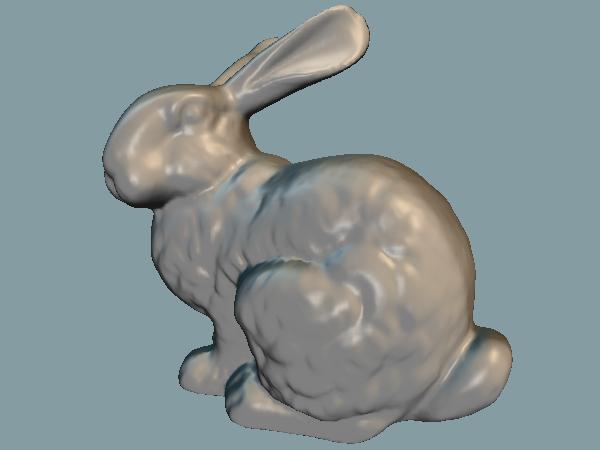
This simpler normal field generally has less detail than the original normal field, and so results in simplified shading. (It works best for shapes that are similar to a sphere, such as the bunny model.) The normal you use in your shader should be a blend between the original normal n and the abstracted normal a, namely: mix(n, a, t), where t is an interpolation parameter between 0 and 1. Compute t as follows.
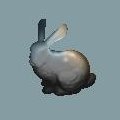
Let d be the distance from the camera to the surface point corresponding to the current fragment, and let d0 = 0.75R and d1 = 6R. Then t = clamp((d - d0)/(d1 - d0), 0, 1). Thus, when the surface point is closer to the camera than d0, we use no abstraction (t = 0). When the surface point is over d1 units from the camera, we use full abstraction (t = 1). In-between distances result in intermediate levels of abstraction. (You can use different constants than 0.75R and 6R; if so please mention it in your write-up.)
Abstracted normals used on distant bunny:
3. Environment and bump mapping using GLSL (25 points)
Abstracted shading with bump mapping and reflections via an environment map:
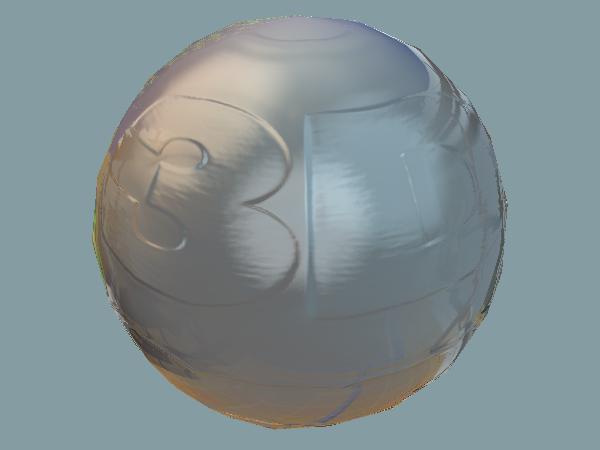
The support code provides a simple shader that initializes a cube map and a bump map. Change the fragment shader to perform lighting calculations (using your abstracted shader from the previous section, or using standard OpenGL lighting calculations if you prefer), with two additions: perturb the normals used in shading computations by doing a simple form of bump mapping, and use the cube map to simulate a shiny surface that reflects the surrounding environment (represented by the 6 images in the cube map).
Compute the perturbed normal in your fragment shader as follows. First compute per-pixel texture coordinates by projecting the fragment position (in world space) to a location s on the unit sphere centered at c (the center of the model's bounding box). Then the texture coordinates are:
uv = vec2(atan(s.x,s.z)/TWO_PI, atan(length(s.zx),-s.y)/PI);
(You will need to define constants PI = 3.1415926535, TWO_PI = 2.0 * PI.)
Use these coordinates to access the value in the bump map texture:
vec3 bump_val = texture2D(bump_map, uv).rgb; // use just the 1st three components
Since color components are stored in the range [0,1] but the bump map
represents perturbations in the range [-1,1], you should double each
component of bump_val and subtract 1 from it. Note: don't forget this step!Compute approximate tangent vectors t and b using:
t = vec3(cos(u)*sin(v), 0.0, -sin(u)*sin(v));
b = vec3(sin(u)*cos(v), sin(v), -cos(u)*cos(v));
where u = TWO_PI * uv[0], v =
PI * uv[1]. Further modify t
and b by projecting them into the tangent plane: from each, subtract
its projection onto the normal direction. You can use these utility
functions:vec3 project(vec3 u, vec3 v)
{
   // return projection of u onto v
   float vv = dot(v,v);
return v * ((vv < 1e-8) ? 0.0 : dot(u,v)/vv);
}
vec3 orthogonalize(vec3 u, vec3 v)
{
   // return u minus its projection on v (result is perpendicular to v):
   return u - project(u,v);
}Finally, normalize the vectors before using them in the bump mapping computation.
In your shader, define a constant 'bump_scale' used to scale the 3rd component of the bump value (try using bump_scale = 0.7, but feel free to try other values as well.) Using bump_scale lets you control the magnitude of the apparent bumps. Smaller values of bump_scale lead to more pronounced bump map effects.
The 3 components of the bump value can now be used as weights to take a weighted sum of the 3 unit-length vectors: t, b, n. Normalize the result, and use it in place of the original normal in your lighting calculations. Namely, use it when computing diffuse shading and specular reflections, and when computing the reflection direction for environment mapping. Code example:
// given t, b, n, and bump_val, as described above (all are of type vec3):
vec3 perturbed_normal = normalize(mat3(t,b,n) * bump_val);The final color at each pixel should be the color resulting from the standard lighting calculations, plus one extra term to simulate the surrounding environment reflected on the shiny surface of the model. To do this, find the reflection vector at the surface point being shaded, and use it to access the color in environment map seen along that direction. Weight the resulting color by ctk, where t = clamp(1.0 - dot(v,n), 0.0, 1.0), and c and k are constants. (Try c = 0.7, k = 2 or 3.) The result is that the reflected environment is only apparent where the surface is near silhouette (where n * v is near zero), which is similar to what we see in many real-world glossy materials.
Lighting design (10 points)
Render an interesting picture and show it to the class. Choose a model (or models), and design a lighting setup (by modifying the lighting setup currently implemented in p2.C). Render the scene in any of your shaders, with the goal of making a nice picture. Grab the image, then post the picture on the phorum as an attachment. Please use the thread dedicated to project 2 images. You can post multiple images (as long as they are good :) You are free to find models elsewhere (or make them). Sharing models with classmates is encouraged. [Note: lighting design is hard!]
In addition to posting your image, also include it with the files you hand in (described below).
Described below.
- Comment your code reasonably, particularly your design decisions
and choice of approach.
- Modularize your code: use a suitable number helper functions with descriptive names.
- Use descriptive variable and function names: apply a suitable tradeoff between symbol-length and descriptiveness.
Extra credit (up to 10 points):
Improve your project by adding additional effects in one or more separate shaders. For example, you could modify the environment-mapping shader to simulate the refraction of light through a transparent material such as glass. The orange book has details on how to do this, and its source code is online.
You are allowed to use online resources or books, but please document what parts of the code came from elsewhere and what parts you wrote yourself. Other possible improvements: be able to control constants used in your shader via the GUI we provided (by adding additional sliders), or use texture coordinates passed in by the application, instead of spherical texture coordinates as described above. (For bump mapping, you will also need to pass in tangent vectors.) Extra credit points will be decided somewhat subjectively by Manoj and Lee, based in part on what your result images look like.
Models
A CVS repository of models has been set up on CAEN servers. To check out your own copies of the models, do the following:
% cvs -d :ext:<your-uniqname>@red.engin.umich.edu:/afs/engin.umich.edu/class/perm/eecs487/cvsroot checkout -P models
Students are welcome to share models with the class by checking them into the repository. (Use binary mode in cvs: cvs add -kb mesh.obj). Please stick to model files that are in the public domain (or that you made yourself). Currently jot can read .obj files as well as native jot .sm files. Many 3D model formats can be converted to obj.
A copy of the models directory is also available on CAEN for those who don't want to check out their own copies. The path is:
/afs/engin.umich.edu/class/perm/eecs487/models/ [Linux etc]
K:\perm\eecs487\models
[Windows] (Depending on how
CAEN space is mounted on your PC.)
Handing in
Turn in your proj2 directory, including:
Copy your files to the following directory on IFS:
/afs/umich.edu/class/eecs487/w07/submit/<uniqname>/p2/
This path is accessible from any machine you've logged into using your ITCS (umich.edu) password. Report problems to ITCS.
Due date
The project is due on February 14, 2007, by 11:59pm. Turning it in 48 hours earlier is worth a 4% bonus; turning it in 24 hours early is worth a 2% bonus.
Last updated: January 25, 2007
Handing in
Turn in your proj2 directory, including:
- all your project 2 source files
- a subdirectory, 'images', containing images you created (e.g. anything you posted on the phorum)
- no model files or binary files please!
- a brief write-up in text format that discusses:
- anything about your implementation that is noteworthy, and
- feedback on this assignment, including suggestions for how it should be changed next time.
Copy your files to the following directory on IFS:
/afs/umich.edu/class/eecs487/w07/submit/<uniqname>/p2/
This path is accessible from any machine you've logged into using your ITCS (umich.edu) password. Report problems to ITCS.
- The timestamp on your key files (p2.C and your writeup) will indicate the time of submission and if this is past the deadline your submission will be considered late. Therefore, you are allowed multiple 'submissions' as long as you respect the deadline.
- Test
the compilation: Your submission must compile without errors and
warnings (except those from external libraries like OpenGL, JOT etc.)
on CAEN Linux or Windows machines. Mention
the platform in your writeup. Code that doesn't compile will be
heavily penalized. (There is no need to compile on IFS; we will do the
grading using the CAEN setup.)
- You are allowed to overwrite your files in the above directory as
many times as you want.
- If the timestamp on these files is past the deadline your submission will be considered late.
- Test this submission procedure and please let the GSI know well
in advance if you encounter and problems.
Due date
The project is due on February 14, 2007, by 11:59pm. Turning it in 48 hours earlier is worth a 4% bonus; turning it in 24 hours early is worth a 2% bonus.
Last updated: January 25, 2007