Git, Github, and You!
Scott Walls, 2012-09-11 (revised 2014 by Peter Chen)
Abstract
This document is a partial introduction to Git and Github in the context of ENGR 100. This is its only purpose, and I do not recommend it as a full introduction to Git, especially outside of the context of this class.
Introduction
The purpose of this document is to help you, a bright-eyed ENGR 100 student, understand the framework we have in place for you to work on your labs. This framework has two main components: Git and Github.
First, I'll talk a little about Git in a general sense. Then, I'll talk about Github, particularly in relation to the project infrastructure. Finally, I'll give a small list of Git commands useful for the project. Those of you who are already familiar with Git and Github can feel free to skim.
Git - What?! Why?!
Git is a distributed Version Control System, or VCS. Let's break that definition down a bit. Better yet, let's do it backwards!
A Version Control System is software that tracks changes to files over time. Examples include CVS, SVN, and Perforce. Using a VCS is a very good idea, since it allows you to easily collaborate with other people, provides some help in the case of computer failure, and allows you to do nice things such as reverting and branching code.
Now, let's talk about what it means to be a distributed VCS. In the old days, the days of CVS and SVN, version control looked a little like this:
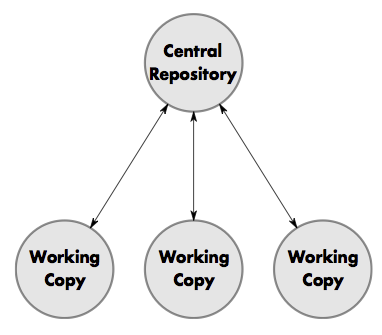
with every programmer having a working copy, which is a folder containing the copy of their code that they were actually working on. They would make their changes, then send them to the central repository. They would also get changes that other users had made from the central repository. There are some problems with this centralized approach.
- If the central repository goes down, you can't commit code to the repository, nor can you pull code from the repository.
- If the central repository explodes, you have lost the record of your code. Any previous versions are lost.
So, rather than centralize, Git distributes! In Git, every user has their own copy of the entire repository (including its entire history). This solves the aforementioned problems. It has the added disadvantage of high disk usage, but disks are cheap these days. This local repository means that we no longer lose all of our data when the central repository goes down, but it also means that we are no longer necessarily tied to a centralized topology. Sometimes, Git projects look more like this:
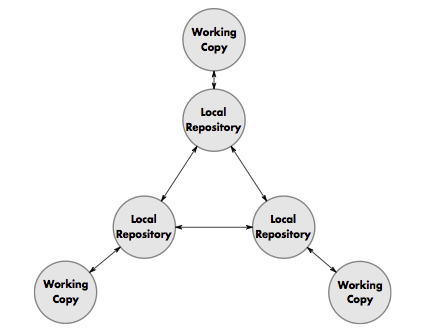
with individual users pushing directly to one another. This is distributed to its logical extreme.
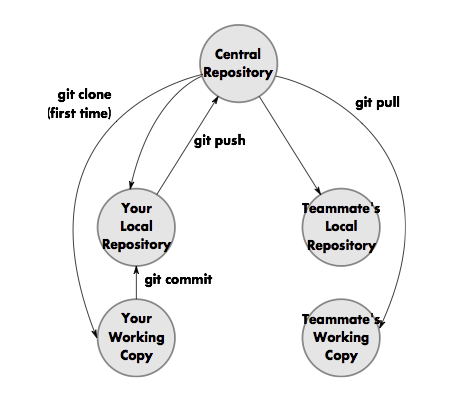
It is possible to manage your project in this entirely distributed fashion in this class, but I will mostly cover using Git a lot like SVN, but with local repositories, which looks something like this:
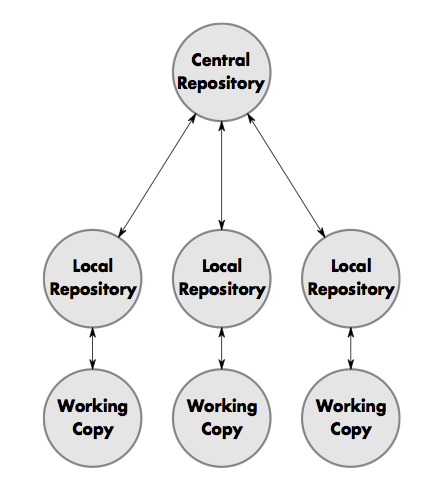
This begs one glaring question: where will the central repository live?
Enter Github (Way of Github? The Game of Github?)
Github is a great site that hosts off-site repositories for Git projects. It gives
free public repositories to open source projects, and it has been nice enough to
give us an ENGR100-W15 organization where we can host private repositories.
We will make a repository for each student to learn git, and a repository
for each group to use for project work. In order to access these
repositories, you need to:
- Create a Github username and set up SSH keys, etc.. Github has great how-tos on this, and I've been told their GUI installer does it for you beautifully, although I haven't tried it.
- Register your Github username
here. We will use this to set up all of your repositories.
repository for you to play with, called engr100/
YOUR_UNIQNAME(whereYOUR_UNIQNAMEstands for your uniqname). I found it helpful to save the link to this repository. The instructions below assume you're working with this test repository. If you're working with the project repository for your group, replaceYOUR_UNIQNAMEwith a sorted, dot-separated list of your group members' uniqnames.
Now you're ready to start learning some Git commands.
A Small Set of Git Commands
Here I'll talk about a few Git commands that I find integral to working with Git and Github with relation to ENGR 100. This is not a comprehensive list of Git commands. See the section "Conclusions and Further Reading" for places that may have such a list. Also, feel free to share any Git commands that you like with fellow students.
The first thing you'll want to do is get a working copy of your test repository set up on your machine, i.e. getting what's already set up from Github to you. This is is called cloning the repository.
git clone git@github.com:engr100/YOUR_UNIQNAMEThe clone command sets up a working copy and repository on your computer that have
the same files as the repository on Github. It also sets up a remote repository
with the name origin, which will come into play in just a little bit. You should
now have a folder called YOUR_UNIQNAME which holds your working copy
and repository. Feel free to play around with it. This repository's sole purpose
in life is to get you up to speed with Git. We will talk more later about clone and other
commands for working with remote repositories.
So now, you work on your code and make a few files. You'd like to save some of your work. The next four commands are intimately related, so I'll talk about them all at once.
The most important piece here is commit. That means taking the code and
putting it into your local repository. Here's where Git is a bit different from
most other Version Control Systems. In Git, commit takes things from your
staging area and puts them into the local repository. The staging area is Git's
name for the set of files that will make it into your next commit. For a file,
the commit is the big time, so "staging area" and its limelight connotations are
appropriate! The staging area and how these commands interact with it are
shown here:
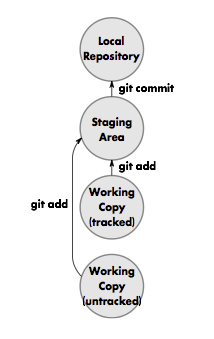
There can be files in your Git directory that Git doesn't pay much attention
to. These files are called untracked. Git will not commit untracked files! In order
to have git track the files, you have to first add them to the local repository,
which will also put them in the staging area. You can use the rm command to
simultaneously remove them from the working copy and delete them.
As previously stated, commit only deals with files in your staging area. To
move a file into your staging area, you use the add command
again. For those of you used to SVN, for example, the -a flag may be
useful; it adds changes to all tracked files to the staging area before
committing. Finally, git status will
show you the status of your files, viz. whether they have been
modified, are in the staging area, or are untracked.
git add FILE
git rm FILE
git commit
git commit -a
git commit -m "commit message"
git status
So you've made some changes to your project. Great. What about your
teammate? She's been coding away, too! Perhaps you two should share your
changes. In order to do this, you'll need to push and pull. Say you'd like to share
your changes with your teammate. First, you commit to your local repository, as
before. Then, you push your local repository to the remote repository (Github).
Once everything's in github, your partner can pull.
One snag in this process is that the repository on Github is initially empty. When I say empty, I mean empty - no files, no starting point, nothing. The first time that you push commits to a new Github repository, you must explicitly tell git what to push:
git push origin -u masterWhen you ran git clone, git set up a reference to a remote repository called origin which
points to the original github repository. Your default branch is called master, so this
command pushes the local master branch to the remote repository named by origin. Since
master doesn't exist there yet, this command will create it. The -u flag links these
local and remote branches together, so that in the future, you can just type git push
or git pull without the extra verbiage.
Besides git clone, there is another way to create a git repository, which you may have
stumbled upon in your own reading, or which you may be more familiar with from SVN:
git initThis command creates an empty repository in the current working folder. If you've done this, made some changes and commits, and now you want to push them to github, this is no problem. You simply first tell git where you're going to push to, and then you push:
git remote add origin git@github.com:engr100/YOUR_UNIQNAME
git push origin -u master
git remote add defines a new remote (reference to a remote repository) called
origin, pointing at a github repository. The second command tells git to push
the local master branch to the origin remote repository, just as above.
Here is quick visual representation of these remote commands:
You may want to be very sure that the files that are on the github repository are the ones you assumed. I would personally recommend using the github web interface for this, although there are many other ways to do it. That's most of what you'll use on the group projects.
Conflict resolution; every group goes through it
While we hope that you find it easy to work together harmoniously with your group members, it is quite common that conflicts will arise in your code. This happens in any version control system when two people make changes to the same part of the code. Maybe you were cleaning up some spacing or fixing a typo while your compatriot was adding something new. You may notice this first when trying to push:
$ git push
To git@github.com:engr100/YOUR_UNIQNAME
! [rejected]        master -> master (non-fast-forward)
along with a helpful hint that you need to pull first before you can push.
So you go to pull from github and see something like this:
remote: Counting objects: 5, done.
remote: Total 3 (delta 0), reused 0 (delta 0)
Unpacking objects: 100% (3/3), done.
From git@github.com:engr100/YOUR_UNIQNAME
   642816d..028663c  master     -> origin/master
Auto-merging file.txt
CONFLICT (content): Merge conflict in file.txt
Automatic merge failed; fix conflicts and then commit the result.
When you go open file.txt to see what on earth happened, you see this mess:
<<<<<<< HEAD
Text text and still more text.
=======
Text text and more text.
>>>>>>> 028663c8fcfa3d08ff77fe60d48b4ce34a8db6c4
This shows you both versions of the file, and the reason for the
conflict (how the versions differ). The first part before the
======== line is the local version, and the part below that line is
the remote version. (That gobbledygook at the end is a checksum of the
remote content, which also identifies that commit. Don't worry about it.)
Git has helpfully added those extra markers in your local copy to show
you precisely where the conflict occurred.
To fix the conflict, you need only edit the conflicting file(s), add them
(which marks their conflicts as resolved), and then commit.
Branches; or, breaking the code without breaking the code
One of git's most useful features is the ability to easily create
and work with branches. A branch is simply a sequence of revisions and
a name to identify them. You've already been working with one branch in git,
called master. If you have no other branches in a git repository, you always
at least have master.
Suppose that you've just finished a major part of the project. All your own tests
are passing, and you're ready to tackle
the next component. This is a great time to create a branch, because the master
branch is currently in a good state. Though perhaps not everything is implemented,
the code that is finished does its job right. Having experimental changes on a
separate branch allows you to revert back to a stable version at any time, and it also
allows you to easily see the changes you've made since you started working on the new
components. Often, developers will create a local branch just to try out some new approach.
If it turns out not to work, they can just delete the branch and pretend it never happened.
The branch command with an argument will make a new branch with that
name. It will NOT move you into that branch. For that, use the checkout
command.
git branch NEWBRANCHNAME
git checkout NEWBRANCHNAME
Or equivalently:
git checkout -b NEWBRANCHNAMEThe branch command with no arguments will show you a list of all the branches on your local repository:
git branchIf you're using branches - e.g. to work on some experimental revision to your
project - you may want to share those branches with your teammates. You've actually
already done this earlier in this tutorial, via git push and git pull. The only
trick here is to remember that, if you created a branch in your local repository,
github doesn't know about that branch, and git doesn't know where to push it.
Just as before, you do this simply by specifying the remote and the branch explicitly
when you push:
git push origin -u NEWBRANCHNAMEIf your teammate has pushed a new branch to github, you may notice its existence the next time you pull:
$ git pull
...
* [new branch]      NEWBRANCHNAME     -> origin/NEWBRANCHNAME
$
Just like any other branch, you can now switch to this branch with checkout:
git checkout NEWBRANCHNAMELastly, every good branch must come to an end. Once the experimental changes on a branch are stable and your tests are passing, it's probably no longer experimental, and it's time to integrate those changes back into your main line of development. This is called merging a branch, and it's done simply as follows:
git checkout master
git merge NEWBRANCHNAME
This switches to the master branch and merges NEWBRANCHNAME back into it.
Hopefully there are no conflicts, but if there are, see above for how to resolve them.
The merge process should be familiar if you've already been pushing and pulling;
git pull is really just fetching commits from the remote branches and then merge-ing
them.
Conclusions and Further Reading
Well, there you have it. That's my little spiel on Git and Github. The gist is that Git is a distributed VCS and we've given you some github repositories.
There's so much more to learn, though! My two favorite references for those of you who plan to use Git are: The Git Parable by Tom Preston-Werner, and the Git Book by Scott Chacon. Both are on the web and just a Google away. The Git Parable is, in my opinion, the best reference for understanding the philosophy of Git wrapping your head around the Git Way. The Git Book is more or less just a spec/tutorial, but much more complete than this little document. Good luck, and remember that your instructors and your classmates are all very good resources!