Basic - Git 1 Fall 2026
- Submission Instructions
- Preface
- GITing started
- GITing around
- You’re going surfing on the internet!
- Autograder
- Summary
Submission Instructions
This homework will be submitted as a repository on the EECS GitLab server. This will become evident as you work through the assignment.
To finish the submission process and get your submission score, you will need to run the autograder. You will need to SSH into the course server (see Basic - Intro):
local$ ssh uniqname@peritia.eecs.umich.edu
(the local$
referring to a shell prompt on your system)
and then run eecs201-test:
peritia$ eecs201-test basic-git1
(the peritia$
referring to a shell prompt on the server)
Preface
Git has an interesting conundrum where to use Git you need to have some understanding of Git, but to understand Git you need to have some experience using Git. While this class’ goal is to help you become more independent problem solvers, this circular dependency may make Git hard to get into, so for this homework we’ll give a guided introduction.
Some other tutorials/resources you can look at besides the official documentation and Pro Git:
-
Atlassian’s tutorials
Atlassian is the company that made BitBucket, JIRA, and Confluence
In this introduction we will be taking an existing codebase and turning it into a Git repository. The process of doing this in an empty directory is exactly the same: instead of an empty directory we have untracked files that are already provided.
GITing started
You are in charge of migrating a small command line calculator program from an archaic, proprietary version control system, whose company became defunct in the 90s, to Git as well as handling the remaining issues in the code.
-
First, we’ll need to acquire the code. The URL for the initial files is https://www.eecs.umich.edu/courses/eecs201/fa2026/files/assignments/basic-git1.tar.gz. Feel free to use your browser to open this link and download the file and once you do, go to step 2.
If you want to do this from the command line, you can as well! However, note that due to some changes in certificates the process can be a bit more involved than it was in previous semesters. I’m providing these for posterity, or if you really want to do this from the command line.
WARNING: recently the certificates used by UMich (and other schools) got renewed, which don’t seem to be present in a lot of system-provided certificate stores and bundles (but are in that of browser’s). I will present both the insecure, workaround way and a more secure workaround.There are two tools we can use to do this from the command line. The one popular option is
wget, which allows you to download files through HTTP and FTP. Unfortunately, macOS does not have easy access towgetwithout Homebrew. That leads us to the other optioncurlwhich is a general tool for making transactions with a server.curlis much more powerful as a general tool. For the following, the#represent comments: you don’t need to run them.If you want to use
wget:# The --no-check-certificate tells it to ignore checking certificates $ wget --no-check-certificate https://www.eecs.umich.edu/courses/eecs201/fa2026/files/assignments/basic-git1.tar.gzIf you want to use
curl:# That's the capital letter O, not the number 0 # The -k tells it to ignore checking certificates $ curl -k -O https://www.eecs.umich.edu/courses/eecs201/fa2026/files/assignments/basic-git1.tar.gzIf you actually want a more secure option with the command line, you can download this file provided by ITS and then supply it as an argument for
wgetandcurl:$ wget --ca-certificate=/path/to/downloaded/certificate https://www.eecs.umich.edu/courses/eecs201/fa2026/files/assignments/basic-git1.tar.gz $ curl --cacert=/path/to/downloaded/certificate -O https://www.eecs.umich.edu/courses/eecs201/fa2026/files/assignments/basic-git1.tar.gz -
You should now see a file called
basic-git1.tar.gzin your current directory (or wherever you downloaded it to). The file is a zipped (compressed via gzip, hence.gz) tarball (hence.tar), which is the result oftar.taris an archiving utility, which fulfills a similar purpose as WinRAR, 7zip, etc. We can decompress and extract it (i.e. “unzipping” it, using zip parlance). You can run either of the listedtarcommands to do so.$ # e(X)tract g(Z)ipped (F)ile $ tar xzf basic-git1.tar.gz $ # most current versions of tar do autodetection and don't actually need the z flag $ # in the future you can just omit the z flag: I just left it in for posterity and completeness $ tar xf basic-git1.tar.gzIf you get an error and you used
wgetorcurlchances are you made a typo with your commands and the server gave you a 404 Not Found webpage instead of the desired file. -
cdinto the extractedbasic-git1/calculatordirectory. -
Let’s play around a bit with the application. Run
$ maketo build the application. You may see some compiler warnings: these are fine and are because of the code, not you, and are intentional. Familiarize yourself with the source code insrcandinc. -
Try running
$ ./calculate 3 + 3 -
Try running
$ ./calculate 3 x 3(that’s the letter x, not an asterisk)
The application error is intended: the code has missing features that you’ll be adding. We haven’t gotten into it yet, but you can directly run executable files by specifying their path. If they’re in the current directory, as a safety mechanism you’ll have to have a slash in the path hence the./Feel free to run other operations. -
Let’s git started. Are you inside the
basic-git1/calculatordirectory? Make sure you’re there!Initialize a Git repository with
$ git init -b master. The-bflag specifies the name of the initial branch. This is the default on many systems, but isn’t necessarily mandatory. For this assignment we’ll be usingmaster, but other assignments will have different branch names. Branch names are aribtray and have meaning only for the developers: Git is not programmed to recognizemasteror any other name as special. -
Let’s blindly add all the files in the current directory with
$ git add .DO NOT commit just yet!Note I said “blindly”. What this does is add everything in the current directory (
.). In most cases, you don’t really want to add everything; you usually want to be a bit more selective on what you want to put into each commit. However, when it comes to the initial steps of setting up a repo, it may be useful: just be judicious in what you commit (we’ll touch on this later). Again, DO NOT commit just yet! -
Run
$ git statusto see what’s currently in the Index (get into the habit of runninggit status; it’ll tell you a lot about what’s going on). -
Notice how we have the final compiled binary
calculateand intermediate object code files inobjin the Index. In general, we don’t want to version the intermediate and final build outputs as they’re the products of the code that we are versioning; no reason to version a thing twice. Other things that we don’t tend to version include development environment specific things, like logs, other output files, or core dumps that your application produces during runtime, and developer system dependent things like editor swap files and weird file system helper files like.DS_STORE. -
Use
$ git reset calculateto unstage thecalculatebinary. Now usegit resetto unstage files underobj/(you can specify the directory itself to get them all in one fell swoop). As a note,git resetcan reset multiple things if you provide more files/directories arguments e.g.git reset file1 file2 dir3. If your OS or file system creates any other junk specific to it (like.DS_STOREon macOS), unstage those as well. -
Before you commit, you may want to set the text editor used for Git commit messages. You can change the
core.editorGit variable to do this. For example, if I wanted to set the editor tonanoglobally (i.e. with all repos on your system unless a repo specifically overrides it):$ git config --global core.editor nano. The Pro Git book has a section with some commands to configure Git to use various common editors. -
Run
$ git status. Make sure that only source code files are staged:calculateandobj/should not be staged, and if you’re on macOS neither should.DS_STOREand.dSYM. -
Use
git committo make this initial check-in/commit of the codebase. While you should make a commit message that follows best practices as mentioned in class, the first one can be a bit weird: a common message is simply “Initial commit”. -
Run
$ git statusfor good measure. Take note of what branch you’re on. If you are not on a branch namedmaster(either because your version of Git has changed the default branch name, or you have configured the default branch name to be something else), go ahead and run$ git branch masterto create the branch, and the run$ git switch masteror$ git checkout masterto switch over to themasterbranch. We’ll be using themasterbranch to submit the assignment. (The branch that’ll be graded will change from assignment to assignment). -
Run
$ git statusagain. Isn’t seeingcalculateandobj/as untracked files annoying ingit status?We can get Git to ignore files and directories through the use of a
.gitignorefile. Inside this file you can list out the names of files and directories that you want Git to ignore, one on each line, and can give it some patterns as well e.g.*is a wildcard. You can find the details about.gitignorein the official documentation. Get Git to locally ignore the intermediate and final build outputs (calculateand the stuff underobj/). If your OS, file system (or text editor) creates files like.DS_STOREor*.swpfiles, you may want to look into a way to ignore such files globally. For example$ nano .gitignorewill open up an instance ofnanothat will save to.gitignore. -
Stage the
.gitignorefile and commit it. -
Run
$ make cleanto delete the intermediate and final build outputs. -
Create a plain-text
READMEfile that explains how to build and clean the application. For example$ nano READMEwill open up an instance ofnanothat will save toREADME. -
Stage and commit your
READMEfile. -
rmtheMakefileand delete a character from theREADME. -
Recover the deleted
Makefileundo the changes to theREADMEusinggit restoreorgit checkout.
Hooray! We’ve migrated the application to Git. Now we have to move onto fixing our problems.
GITing around
-
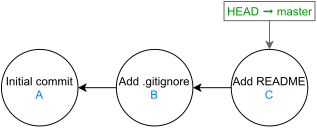
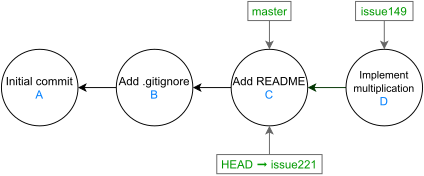
Take note of the comments that mention an issue in the source code under
src/. At this point you should be here on the Git commit graph:
-
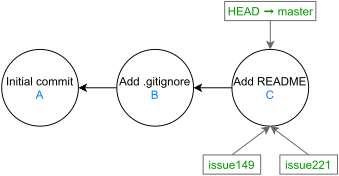
From here, we are going to make two topic branches that deal with each of the issues. Use
git branchto create branchesissue149andissue221that correspond to the issues mentioned in the comments.
-
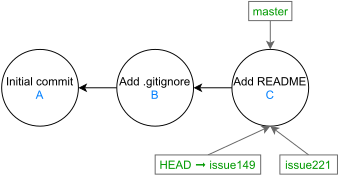
Switch to
issue149usinggit switchorgit checkout.
-
Lets fix up its code, implement the fix by adding this case in the
switchblock as follows below the comment menioning the issue by adding this case in the specified file:src/calc.c --- case OP_MUL: *result = arg1 * arg2; return STATUS_OKAY; -
Make sure to delete the comment mentioning the issue in the code, as you have now dealt with it.
-
Run
$ maketo compile the application. Test outcalculateto see if the issue of the current branch is resolved by performing the multiplication again. Make sure that it can be compiled and run! -
Run
$ git diffto see how your files have changed. -
Run
$ git add -uto add files that you have modified. If you have staged files that are unrelated to this issue, be sure to unstage them as this branch is focused on fixing the appropriate issue. -
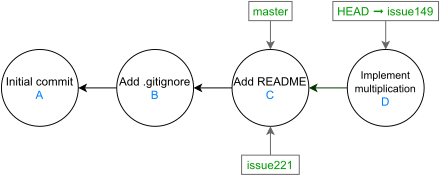
Commit the fix, making sure to have a properly formatted and descriptive title and body for the commit message as well as including a reference to the issue number in the body. Remember to go by the style guideline!
-
Switch to the branch
issue221. You’ll notice that the changes made in branchissue149are gone: the commit made for it is not in the history forissue221.
Repeat steps 4 through 9, implementing the fix as follows by adding this case:
src/main.c
---
    case STATUS_DIV_BY_ZERO:
        fprintf(stderr, "Divide by Zero\n");
        return 5;


src/calc.c
---
        if (arg2 == 0) return STATUS_DIV_BY_ZERO;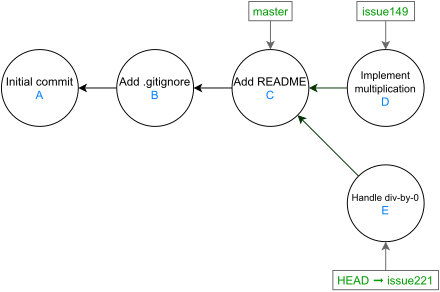
-
Compile it again with
$ make. Make sure there are no compilation errors (warnings are fine)! -
Test to see that
calculatecan handle a divide by zero:$ ./calculate 3 / 0. -
Make sure that you’ve made your commit for
issue221. -
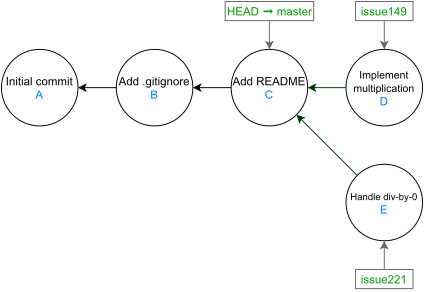
Switch to the
masterbranch.
-
Now we are going to bring the commits from the topic branches over to the
masterbranch. -
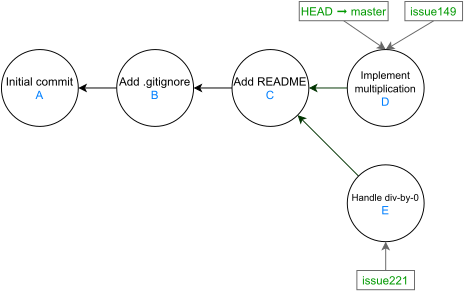
Run
$ git merge issue149to bring over the commits from theissue149branch. Note thatissue149andmasterhave not diverged, making this process painless. This is known as fast-forwarding, where a branch just moves its pointer up to where another branch is.
-
Now use
git mergeto bring over the commits fromissue221. Note thatissue221andmasterhave now diverged with the topic branch sincemasterhas moved forward to whereissue149is whileissue221had sprouted off frommaster’s old position. This will necessitate a special merge commit that gets automatically generated (which you don’t have to reword for this assignment). If the merge has to stop due to not being automatically resolved, usegit statusto see where the merge conflict is occurring and modify the files to get them into working order (i.e. it compiles and runs as intended for that branch), then complete the merge (git statuswill give you instructions on how to do this).
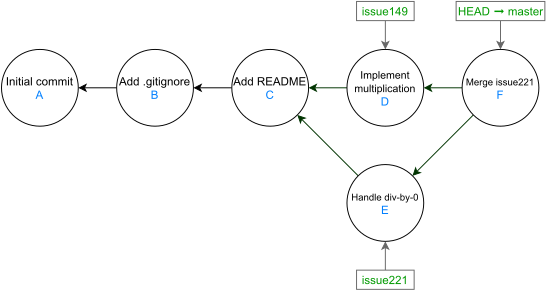
-
Run
$ git showto see what this latest commit entails. -
Run
$ git show HEAD1or$ git show HEADto see the first parent of this merge commit. -
Run
$ git show HEAD2to see the second parent of this merge commit. -
Run
$ git logto show you the list of commits. Ifgit loghas used a “terminal pager” (e.g. it gives you an interface that lets you scroll up and down the log, and has a:at the bottom left), you can exit out of it by hittingq.
Now that your job is finished, let’s push it to a remote repository.
You’re going surfing on the internet!
-
Log into https://gitlab.eecs.umich.edu and set up your EECS GitLab account.
-
Set up SSH with your EECS GitLab account (if you haven’t already). Remember that SSH key you created in Basic - Intro? It’ll come to play here. You can find this setting under your account settings > SSH Keys, and the site has a guide on how to set it up. This allows you to painlessly clone/pull/push with the EECS GitLab server. (The counterpart to SSH is HTTPS, but SSH is seriously easier to work with on a regular basis).
-
Create a completely blank, without a README, new private “Project” (i.e. remote repository) with exactly the name:
eecs201-basic-git1. Remember to uncheck the box about creating a README!GitLab “Projects” contain more than just a Git remote repository: they also have things such as membership management, issue tracking, etc.
-
Let’s now set up this EECS GitLab Project as the remote for your local repository.
-
Add it as the “remote” named
origin:$ git remote add origin git@gitlab.eecs.umich.edu:<your uniqname>/eecs201-basic-git1.git.e.g. for me:
$ git remote add origin git@gitlab.eecs.umich.edu:akamil/eecs201-basic-git1.gitThis uses
git remoteto add a “remote” namedoriginwith a specified SSH URL. A “remote” is another place that the repo is stored: in this case, we’re using the EECS GitLab server as a place to store a “remote” copy.originis often used as a name for the main place the code is remotely stored, and this name used for this local repo as a shorthand for the entire URL. -
Now let’s push the all commits from all the branches to the remote:
$ git push -u origin --all.-usets the upstream tracking information for the local branches, allowing them to push/pull commits from the remote branches.originis the remote that we are referring to.--allpushes all of the branches. You could instead, say, push onlymastere.g.git push -u origin master.You only need the
-uflag when you do your first push: this flag is there to set the initial information about where the code is going. On subsequent runs ofgit pushit will remember where the push is going. -
In the EECS GitLab Project’s Manage>Members>Invite members and add
akamilas a Reporter. As part of the grading process for this assignment we will be looking at your repositories on the EECS GitLab. -
Back in your local repository, make sure you are in
master. -
Create a file called
report.txt. -
On the first line of the file, put down an estimate of how long you took to do this assignment in minutes as an integer (e.g. “37”, “84”: just numbers, no letters).
-
On the second line and onwards of the file, put down what you learned (if anything) by doing this assignment. If you already knew how to do all of this, just put “N/A”.
-
Stage and commit this
report.txtonmaster. -
Run
git pushto push this commit to your EECS GitLab repository.
Autograder
The course server has the ability to grade your assignment and give you credit! This will be done for all assignments submitted via the EECS GitLab server. Let’s trying running it for this assignment:
-
If you haven’t already, fill out the course server account form (see Basic - Intro).
-
Log in to the course server. If you don’t remember how to, you can run
$ ssh <youruniqname>@peritia.eecs.umich.edue.g. for me, I’d run$ ssh akamil@peritia.eecs.umich.edu. -
Run
$ eecs201-test: by itself it will print out usage instructions as well as the gradable assignments at that given moment. -
Run
$ eecs201-test basic-git1to run the autograder on your assignment.Please note that there is a cooldown period between runs: this is meant to encourage you to take a moment and evaluate what you have done locally. In many professional situations shared testing resources are in high demand, so your code might not get to be tested immediately, and even then the tests may take many minutes or even hours to complete. It’s generally good form to do some local sanity checks (e.g. checking if the code/submission meets some basic requirements such as being able compile and run without immediately running into an error, or running some basic tests) so you don’t wait several hours to find out you had a compile error or that your application immediately crashes.
Summary
-
Download and extract the starter files
-
Build and test the application
-
Commit all the existing code without committing any build or output files (or things like
*.swpor.DS_STOREfiles). -
Create a
README. -
Delete the
Makefileand modify theREADME, then undo those changes. -
Create topic branches for the two outstanding issues in the code.
-
In each branch fix the issues.
-
Merge the branches back into
master. -
Set up your EECS GitLab account and add your SSH key.
-
Create your EECS GitLab Project/repo for this assignment.
-
Push your commits to this EECS GitLab repo.
-
Create a
report.txt, commit it, and push the commit. -
Grade your submission with the autograder.